


The lazy load script is a great way to save bandwidth and load your pages much faster. Images that are not visible on the initial page load are not loaded or downloaded until they come into the main viewing area. Once an image comes into view it is then downloaded and faded into visibility. Scroll down this page to see the script in action.
Setup is very easy! By default this script is disabled, in order to enable it simply choose All Images or Individual Images from the drop down, as shown below from inside the template configuration page.

All images will load every standard image on the page with lazy load. There is no extra configuration or extra code to add with this configuration, it will just happen automatically. Individual images would be used if you want only certain images to load with this script and not all of them. To do this simply add class="s5_lazyload" to the image like so:
This script is compatible with Firefox3+, IE8+, Chrome14+, Safari5.05+, Opera 11.11+


Setup is very easy! By default this script is disabled, in order to enable it simply choose All Images or Individual Images from the drop down, as shown below from inside the template configuration page.
All images will load every standard image on the page with lazy load. There is no extra configuration or extra code to add with this configuration, it will just happen automatically. Individual images would be used if you want only certain images to load with this script and not all of them. To do this simply add class="s5_lazyload" to the image like so:
<img class="s5_lazyload" src="http://www.yoursite.com/image.jpg"></img>
This script is compatible with Firefox3+, IE8+, Chrome14+, Safari5.05+, Opera 11.11+
See the script in action:
- 01Download the installation package from our download section.
- 02Once the download is complete go to the backend of Joomla.
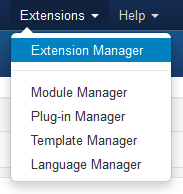
- 03Navigate through your menu system to Extensions/Extensions Manager.
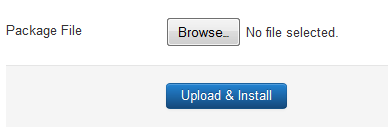
- 04Once at the installation screen click the browse button and navigate to where you downloaded the template file.
- 05Once you have the file selected click 'Upload File and Install'
- 06Navigate through your menu system to Extensions/Template Manager.
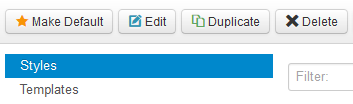
- 07Find the radio button next to the newly installed template.
- 08Click on the Default button at the top right of the screen and you're done!
The template is now installed, now let's set it as the default template:
The info slide script is a great way to display your content to your customers! It will place a sliding text box over any image on the page. It can be placed inside of content or modules. It will also automatically adjust to any size screen size on window resize. See below for a demonstration. In the backend of Vertex you can pick between a javascript only version or a pure css version.
Javascript Version
CSS Version Default
CSS Version 1
CSS Version 2
CSS Version 3
Example Slide
This is dummy text. You can add any
text or html markup here.
CSS Version 4
Example Slide
This is dummy text. You can add any
text or html markup here.
CSS Version 5
Example Title
Example Title
CSS Version 6
Example Title
Example Title
CSS Version 7
CSS Version 8
CSS Version 9
CSS Version 10
I like what I see! I want to JOIN TODAY.